


Description
1. Introduction
Thank you for choosing the AWithZ H2 Battery Spot Welder. This manual provides essential information for the safe and efficient operation, maintenance, and troubleshooting of your device. Please read this manual thoroughly before using the product and retain it for future reference.
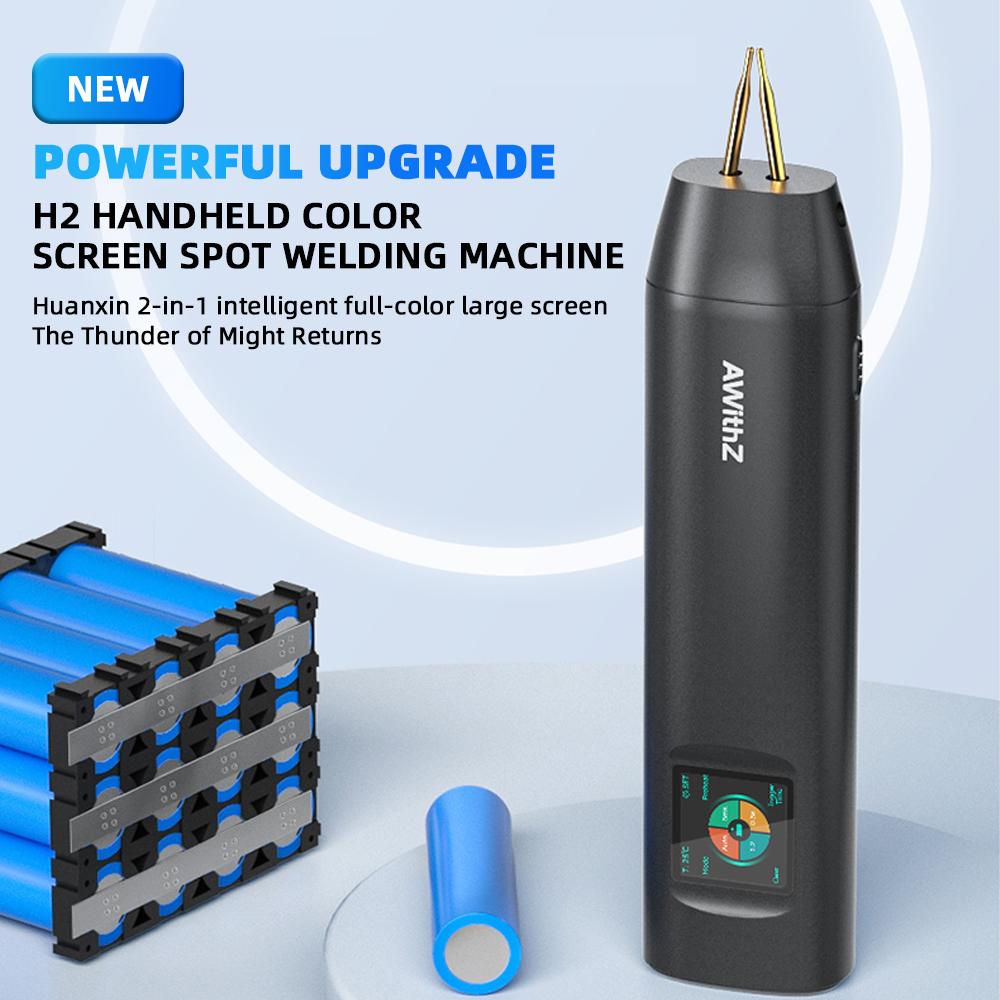
The AWithZ H2 is a portable, handheld spot welder designed for various battery welding applications, including 18650 battery packs and mobile phone battery repairs. It features a 1.5-inch LCD screen, 99 adjustable gear levels, and a 7500mAh high-capacity battery.
2. Safety Instructions
Always observe the following safety precautions to prevent injury or damage to the device:
- Ensure the work area is well-ventilated and free from flammable materials.
- Wear appropriate personal protective equipment (PPE), including safety glasses, during operation.
- Do not operate the spot welder near water or in damp conditions.
- Keep the device out of reach of children.
- Do not attempt to disassemble or modify the spot welder. Refer all servicing to qualified personnel.
- Avoid direct contact with the welding pins during operation.
- Ensure the battery being welded is compatible with the device and properly prepared.
- Unplug the device when not in use or before cleaning.
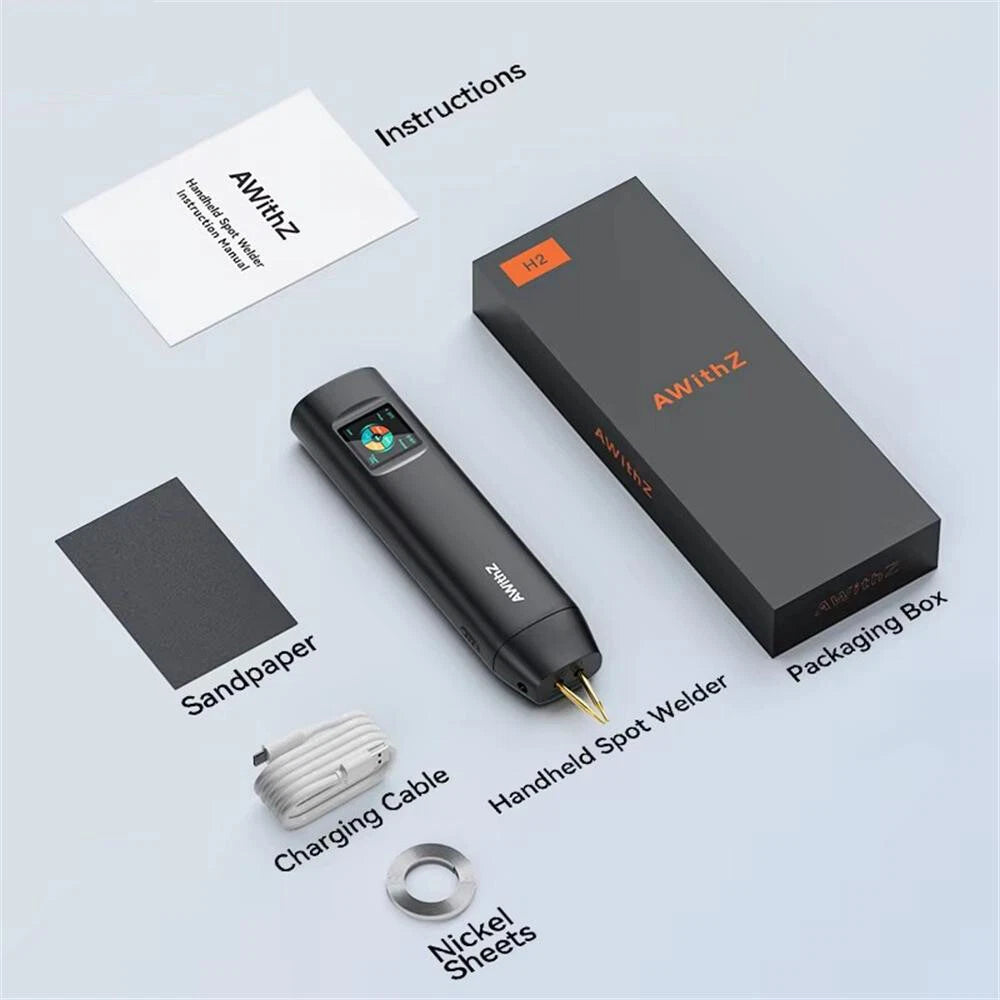
3. Package Contents
Verify that all items are present in the package:
- AWithZ H2 Battery Spot Welder (1 unit)
- Nickel Plated Sheet (2 meters)
- Type-C Charging Cable (50 cm)
- Spot Welding Pens (40 cm pair) - Note: The H2 model features integrated welding pins, this refers to external pens if applicable or general accessories.
- Frosted Paper (1 piece)

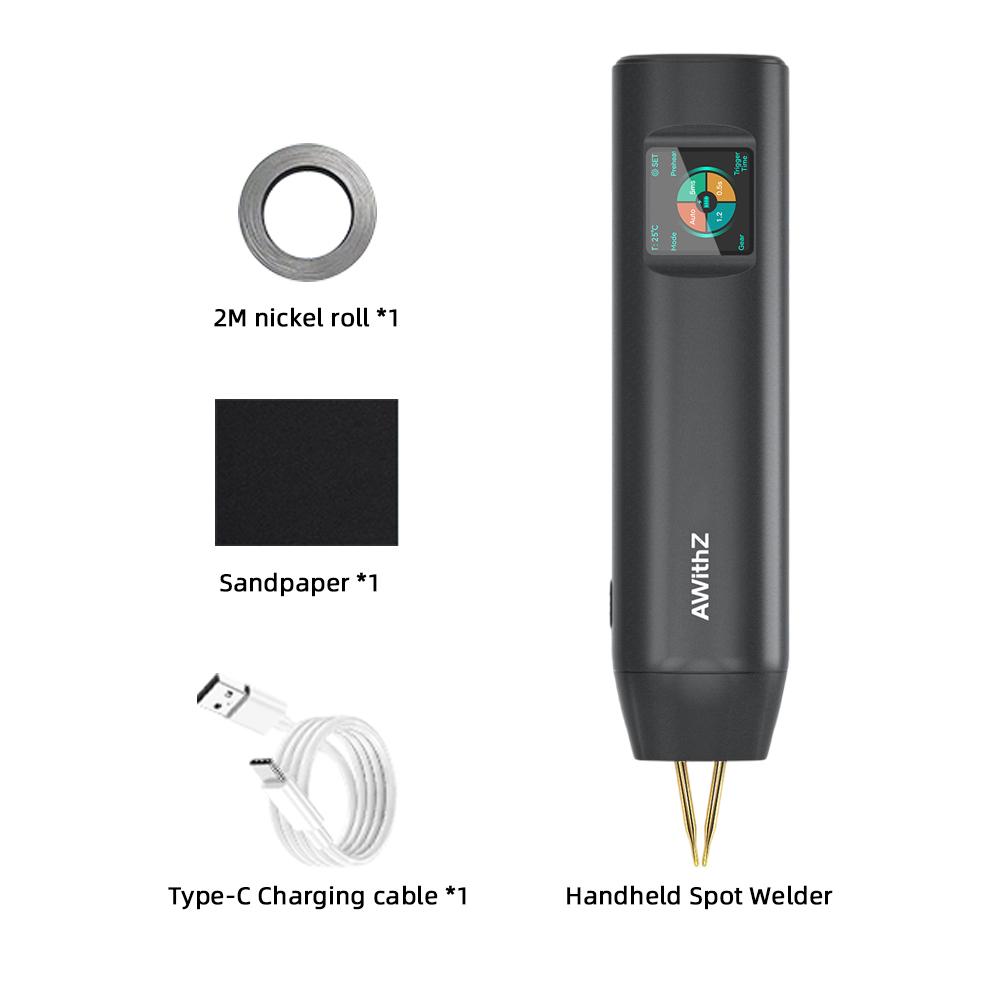
Image: The AWithZ H2 Battery Spot Welder shown with its integrated welding pins, alongside the included 2-meter nickel plated sheet, 50cm Type-C charging cable, and a piece of frosted paper.
4. Product Overview
The AWithZ H2 features a compact design with an intuitive interface.

Image: A diagram illustrating the key components of the AWithZ H2 Spot Welder, including the LCD screen, Type-C charging port, ON/OFF/Option Toggle button, Adjustment key, and Welding Pins.
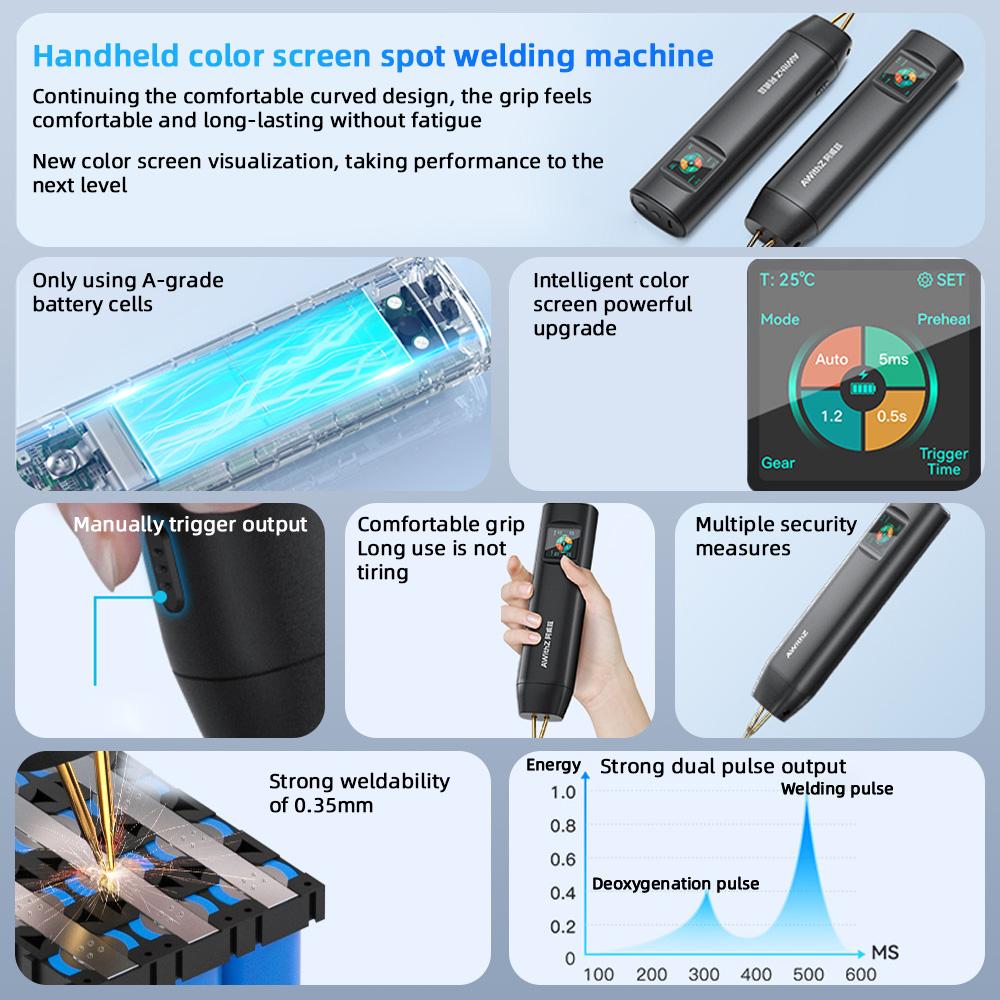
4.1 Key Features
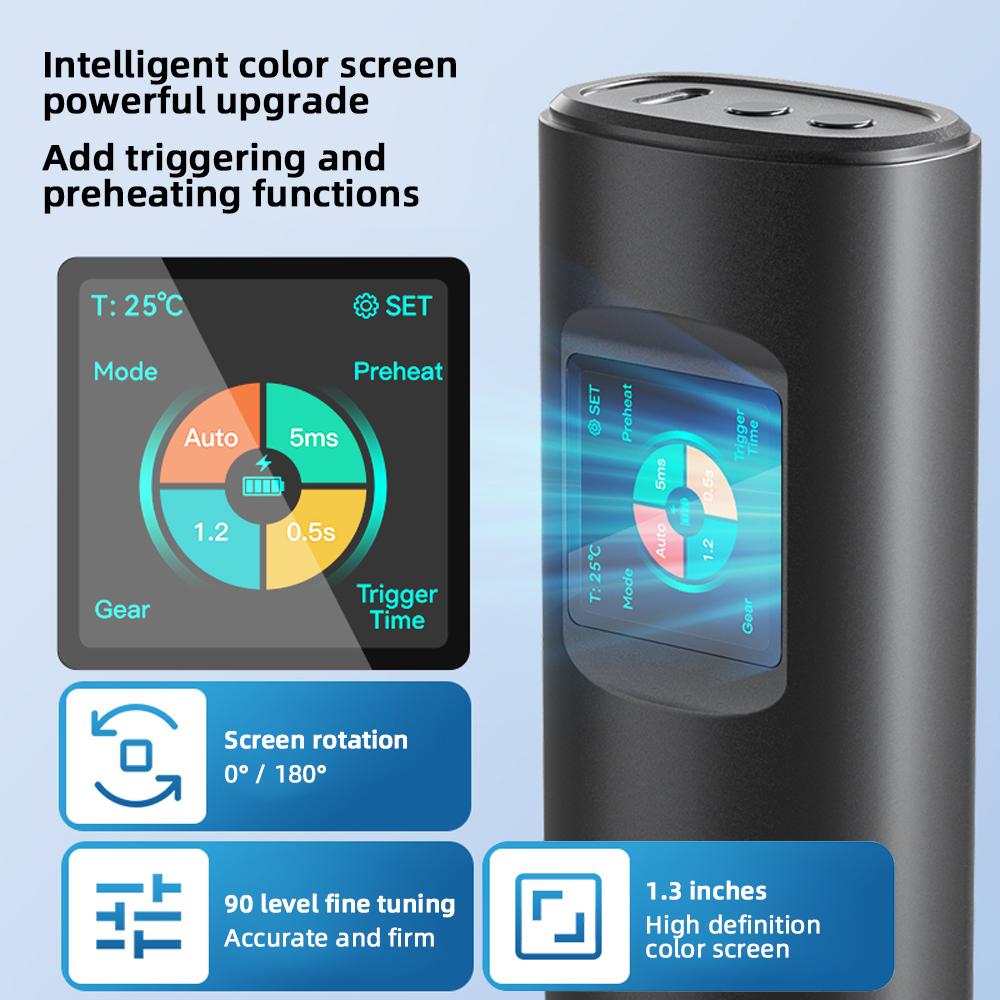
- 1.5-inch LCD Screen: Displays temperature, battery level, gear setting, trigger time, and continuous spot welding times.
- 99 Adjustable Gear Levels: Allows for precise control over welding strength, suitable for various material thicknesses (0.1mm to 0.25mm).
- Auto and Manual Modes: Provides flexibility for different welding scenarios.
- Integrated Spot Welding Pins: Designed for convenient one-handed operation.
- 7500mAh High Capacity Battery: Ensures extended usage and quick charging (approx. 3.5 hours).
- USB Power Bank Functionality: Can be used to charge other USB devices.
5. Setup
5.1 Initial Charging
Before first use, fully charge the spot welder. Connect the provided Type-C charging cable to the charging port on the device and to a suitable USB power adapter (not included). The LCD screen will indicate charging status. A full charge takes approximately 3.5 hours.
5.2 Preparing the Welding Surface
Ensure the surfaces to be welded are clean and free of oxidation, dirt, or grease. Use the provided frosted paper or fine-grit sandpaper to lightly abrade the nickel strip and battery terminals if necessary. Clean surfaces ensure optimal conductivity and strong welds.
6. Operating Instructions
6.1 Power On/Off
To power on the device, press and hold the ON/OFF/Option Toggle button located at the top of the unit. To power off, press and hold the same button. The device also features a low-power standby mode, activated by holding both adjustment buttons simultaneously.
6.2 Navigating the LCD Screen
The 1.5-inch LCD screen displays various parameters. Use the ON/OFF/Option Toggle button to select an option, and the two adjustment buttons (forward/backward) to change values within the selected option (e.g., gear level).

Image: A close-up view of the AWithZ H2 Spot Welder's 1.5-inch LCD screen, showing indicators for temperature, mode (Auto/Manual), battery level, gear setting, trigger time, and preheat status.
6.3 Adjusting Gear Levels
The device offers 99 adjustable gear levels (1.0 to 9.9) to accommodate different welding needs. Higher gear levels provide more welding power.
- Gears 1.0 - 3.9: Suitable for mobile phone batteries and very thin materials.
- Gears 4.0 - 7.0: Recommended for materials with thicknesses ranging from 0.1mm to 0.15mm.
- Gears 7.1 - 9.9: For materials with thicknesses ranging from 0.15mm to 0.25mm.
Note: Always perform test welds on scrap material to determine the optimal gear setting for your specific application and material thickness. Excessive power can damage the material or battery.

Image: A visual representation of the 99 adjustable gear levels, indicating their suitability for different material thicknesses and usage scenarios, from 0.1mm to 0.25mm.
6.4 Welding Operation (Auto Mode)
In Auto Mode, the welding pulse is triggered automatically when both welding pins make proper contact with the material.
- Place the nickel strip onto the battery terminal or desired welding point.
- Position the integrated welding pins firmly and squarely onto the nickel strip, ensuring good contact with both the strip and the underlying material.
- The device will automatically detect contact and initiate the welding pulse. You may hear a distinct "pop" sound.
- Lift the welding pins. Inspect the weld for strength and quality.

Image: The AWithZ H2 Spot Welder being used for one-handed operation, demonstrating its integrated spot welding pen design compared to traditional two-handed pens.
6.5 Welding Operation (Manual Mode)
In Manual Mode, you control when the welding pulse is triggered.
- Place the nickel strip onto the battery terminal or desired welding point.
- Position the integrated welding pins firmly and squarely onto the nickel strip, ensuring good contact with both the strip and the underlying material.
- Press the Manual Key (refer to Product Overview diagram) to initiate the welding pulse.
- Lift the welding pins. Inspect the weld for strength and quality.
6.6 Continuous Spot Welding
The AWithZ H2 supports continuous spot welding, allowing for two consecutive welds to be performed quickly. This feature is useful for welding thicker materials or for creating stronger bonds. Consult the LCD screen for the continuous spot welding times indicator.
6.7 Power Bank Function
The device can also function as a power bank. Connect your USB device to the Type-C charging port on the spot welder using a compatible cable to charge it.
7. Maintenance
7.1 Cleaning the Welding Pins
Over time, the welding pins may accumulate residue or oxidize, affecting welding performance. Use the provided frosted paper or fine-grit sandpaper to gently clean the tips of the welding pins. Ensure the device is powered off before cleaning.
7.2 Storage
Store the spot welder in a cool, dry place, away from direct sunlight and moisture. Keep it in its original packaging or a protective case to prevent damage.
7.3 Battery Care
To prolong battery life, avoid fully discharging the battery frequently. Recharge the device when the battery level is low. If storing for an extended period, charge the battery to approximately 50% and recharge every 3-6 months.
8. Troubleshooting
| Problem | Possible Cause | Solution |
|---|---|---|
| No weld or weak weld |
|
|
| Device does not power on |
|
|
| Overheating indication on LCD |
|
|
9. Specifications
| Feature | Detail |
|---|---|
| Model | H2 |
| Brand | AWithZ |
| Screen | 1.5-inch LCD |
| Adjustable Gears | 99 Levels |
| Battery Capacity | 7500mAh Lithium Polymer |
| Charging Time | Approx. 3.5 hours |
| Weldable Thickness | 0.1mm - 0.25mm (Nickel Strip) |
| Power Source | Battery Powered |
| Item Weight | 290 g |
| Package Dimensions | 22.2 x 8.5 x 3.4 cm |
10. Warranty and Support
Estimate shipping